Home » Posts tagged 'kitchen remodeling'
Tag Archives: kitchen remodeling
Demystifying the Role: General Contractors Serve as Project Orchestrators
General Contractor Lexington KY is a key member of the construction team that turns architects’, engineers’, and interior designers’ blueprints and renderings into reality. The job description encompasses many duties and requires excellent project management skills.

The best general contractors can create a realistic scope of work for their budgets and adhere to deadlines. They also have an eye for detail and can spot mistakes in craftsmanship.
One of the most important activities that a general contractor engages in is planning. This includes creating a timeline for each task and setting deadlines to implement those tasks. This can help prevent costly errors and delays in construction. It also helps the project stay on budget.
As construction progresses, a GC works with the architect to ensure that construction is taking place according to the plans and blueprints. GCs also serve as the primary point of contact between subcontractors and the project owner. They ensure that work is completed to specifications before disbursing payment to the subcontractors.
GCs are responsible for ordering and delivering materials, which is an important part of ensuring that the project gets finished on time. This can involve managing a large number of suppliers and vendors. GCs can also save money on supplies by purchasing them in bulk and by working with local manufacturers and distributors.
A GC must also be familiar with the different types of materials that are used in a construction project. They can use this knowledge to determine which materials will be most appropriate for the project and its environment. They also need to know how much each type of material costs and what their delivery lead times are.
Lastly, a GC must be aware of all applicable laws and regulations that pertain to the construction industry. This involves staying up to date on changes in building codes and other regulations, as well as understanding the requirements for licensing. It also means keeping up with professional training, as many areas require continuing education for contractors.
The goal of scheduling is to assign tasks and milestones based on the availability, capacity, and cost of resources. In construction, these resources include labor, equipment, and materials. General contractors are responsible for creating a master schedule and planning the daily activities of the project. They also hire specialty tradesman to manage specialized aspects of the construction process, like concrete and electrical work.
A general contractor may use various methods to create a construction schedule, including PERT and GANTT. PERT is a common scheduling method that organizes timelines in an easy-to-understand format and allows for flexibility when meeting milestones. It also differentiates between fixed deadlines and those with float, which is helpful for keeping projects on track.
When creating a construction schedule, it’s important to consider the critical path. This is the set of tasks that must be completed before the project can finish on time. Delays in these tasks can result in penalties from clients or financial consequences for the general contractor. They may include extended equipment rental periods, additional labor costs, and late payment fees.
The best way to improve a construction schedule is by communicating it clearly with all stakeholders. A clear schedule can help reduce the risk of conflicts and ensure that everyone is on the same page. It’s also important to ensure that all team members and stakeholders have the necessary skills and capabilities to perform their tasks. This will help you avoid rework and costly delays.
It’s also vital to review the contract details and read them carefully. Some contracts require specific durations for tasks, which must be taken into account when creating a schedule. In addition, some contracts will specify requirements for contractor-prepared change order impact analyses. This will help you evaluate whether or not a change order will affect upcoming timelines and milestones.
A construction project’s budget is a crucial element of completing the project within time and at the right cost. This is where a general contractor’s planning and estimating skills come into play. GCs use these skills to establish a budget, follow it through, and make adjustments as necessary.
To do this, a GC creates an estimated cost report and compares it with actual expenses to determine if there are any significant variances. This is a critical part of avoiding change orders that can wreak havoc on project timelines and budgets.
The responsibilities of a GC also include managing staff and ensuring that everyone has the proper equipment for the job. They also work to streamline the supply chain for raw materials and other project components. This includes determining the best way to get these materials from vendors, negotiating prices, and ensuring that all parties involved receive their payments on time.
As an employer, a GC must ensure that their team members have the tools and resources to complete the work on-time and at the right quality. This requires a thorough assessment of each member’s skills and technical capabilities. This is especially important since a construction project can be unpredictable. For example, economic and climatological trends may affect project costs or require the addition of new features that weren’t initially envisioned.
Additionally, a GC must provide the client with an estimate of the total cost for the construction project, including soft costs. This can include fees related to building and occupying permits, testing and inspections, design services, and accounting services. These costs can add up quickly, so a GC must dedicate extra time to estimating them carefully.
In construction, contract negotiations can be a complex process. A general contractor must balance the demands of the owner with the needs of the project team. This requires the GC to have extensive practical experience and stay up-to-date with best practices and trends in the industry.
The GC must also understand the intricacies of project management and the various roles and responsibilities of each party involved in the project. This allows them to propose a fair bid and make sure that all parties are satisfied with the final product. This includes ensuring that all parties have sufficient insurance coverage and obtaining lien waivers as needed. The GC must also provide adequate support to subcontractors, such as equipment, materials, and labor.
When negotiating with the client, the GC must be aware that they are not there to win a bidding war but rather to fulfill the client’s vision. This requires a high level of professionalism and an ability to listen to the client’s concerns. This can be difficult for inexperienced contractors.
During contract negotiations, the GC should also be careful not to become overly aggressive or confrontational. This will not only affect the quality of the finished product but could also lead to future disputes. The GC should also be sure that they are familiar with all state-specific requirements regarding insurance, change orders, and dispute resolution processes. They should also make a point to review the project’s specifications and scope of work before entering into any agreement. Lastly, the GC should make certain that they know who is providing the insurance and that they are fully apprised of all insurance policies. This can help avoid misunderstandings later on in the project and can save time and money.
Supervision is one of the most crucial activities for a general contractor. This includes monitoring the work of subcontractors and their employees and ensuring that everyone follows the correct safety protocols. It also involves providing tools and equipment to workers and ensuring that they use them correctly. In addition, supervision is responsible for resolving conflicts and handling any other issues that arise on the jobsite.
Major construction projects often involve large numbers of people working in a variety of capacities. A GC must be able to manage all of these elements to ensure that the project is completed as scheduled and within budget. They also need to track all construction expenses and compare them against the projected budget.
The GC must also be familiar with the various responsibilities and warranties that are written into the contract documents. They must be able to translate this language into practical terms that can be understood and fulfilled by all parties.
Another key responsibility of the GC is overseeing vendor management. This involves managing all aspects of the supply chain for a project, including coordinating with vendors and negotiating prices and quality. This is especially important for a large project, where there may be many different vendors involved in the process.
Lastly, the GC must be able to communicate with all of the different stakeholders in the project, from the owner to the design team and engineering firm. They need to be able to understand the needs of each party and deliver what they are looking for from the project. This can be a complicated task, especially in a construction industry where communication is not always straightforward. This can lead to expensive mistakes that can have significant consequences for the project.
Cabinet Refinishing – Give Your Cabinets a Fresh Look
Cabinet Refinishing San Jose CA is an option that allows you to keep your existing cabinets and give them a fresh new look. It is usually cheaper than refacing and takes much less time.
Refinishing your kitchen cabinet doors involves stripping the old paint or stain, sanding, and priming. The doors then receive two coats of color or a dye, with light sand between each.
Painting your cabinets is a cost-effective way to refresh the look of your kitchen without having to invest in expensive new hardware. It is also a good option if you want to change the color of your cabinets or simply update them to a more modern style. However, cabinet refinishing requires meticulous work and time to ensure a quality finish that stands up well to daily use and exposure to heat and moisture.
A quality paint job can make your kitchen look brand new and add significant value to your home. The key is to hire a professional who is experienced in refinishing cabinetry, has references and is properly insured and licensed. They should take the time to thoroughly clean all surfaces and carefully tape off areas where necessary, and also allow adequate drying time between coats.
You should also be aware that not all cabinet paints are created equal, and it is important to choose a product that is designed for high-traffic areas like kitchens. The natural oils in our skin break down acrylic paints over time, and when this happens, chipping and peeling occur. Paints that are formulated for cabinets are specifically made to resist this wear and tear, making them more durable and long-lasting.
Using the right tools is another crucial factor in achieving a great-looking finished result. Choosing brushes and rollers that are the proper size for the surface you are working with will save you time, as well as helping to prevent sloppy coverage. It is also important to use a degreasing cleaner before applying the first coat of paint, and to allow it to dry completely. This will help the subsequent coats of paint adhere to the surface better and will prevent the need for repeated applications.
Be sure to remove all of the doors and drawers from your cabinet boxes and label them with a permanent marker before starting the process. This will make it much easier for you to reassemble your kitchen afterward and will help you keep track of which items go where. Once you have your cabinets painted, it is wise to wait a few days before reinstalling them in order to give the paint time to fully cure to a hard enamel-like finish that is resistant to staining and scratching.
Stain
Stain offers a natural look that many homeowners enjoy. It allows the natural grain of wood to show through, providing a richer finish than paint. It’s also water-resistant, making it easy to clean spills and splashes without worrying about ruining or staining the finish. Stain also tends to match color touch-up markers better than paint, which can often have a noticeable hue difference in varying temperatures.
Before you can apply stain, though, it’s important to prepare your cabinet doors and drawer fronts for the project. Remove all hardware and set the pieces aside in a labeled container or on a dedicated work area so they won’t get lost or misplaced during the process. Vacuum and wipe down the cabinets, removing any dust that may have accumulated during sanding.
Then, clean the cabinet and door surfaces using trisodium phosphate (TSP), a heavy-duty cleaning powder that works great on wood. Mix the product according to its instructions and use a sponge to scrub each surface. Make sure to thoroughly wash the cabinet and door bevels and textured areas, as well as any other areas that might be difficult to reach with a flat brush.
After the cabinets have dried, it’s time to stain. First, make sure the surface you’re working with can accept stain by sanding again. This time, you’ll want to use a 150- to 220-grit paper and be sure to sand in the direction of the wood grain. Wipe away the excess stain within a few minutes after applying it to lighten the color or leave on for longer for a darker shade.
Be sure to test your stain on a small section of the cabinet or door. It’s also important to let the stain dry for a few hours before you begin to touch it up. Apply several coats of stain as necessary to achieve the color you’re aiming for. If you’re going from a dark to lighter shade, more coats will be required than if you were starting with a light color. If your new stain doesn’t look as good as you expected, lightly scuff the surface with steel wool after it has cured for several hours before applying a second coat.
Glaze
A glaze can transform a stained or painted cabinet door into something elegant and beautiful. It is usually a dark pigmented glaze applied with a brush or sponge to highlight the details on the cabinet door, and then wiped off. The wiped off areas leave a darker highlight that can appear antiqued or distressed, depending on the color you choose. It is also a great option for cabinets with a lot of detailing, like grooves or carved edges.
Cabinet glazes can be either warm or cool, and your kitchen design specialist can help you decide which style will best suit your home. It is always a good idea to test the glaze on a small area of the cabinet first, so you can see how it looks and feel comfortable with it before applying it to the whole kitchen.
Before attempting to apply any type of glaze, it is important that you thoroughly clean the cabinet doors. Using a degreaser spray or a rag dipped in degreaser, wipe all surfaces to remove any dirt and oils that may interfere with a clean finish. If necessary, use a wood filler to repair any dents or holes. Once everything is repaired and clean, it is time to start prepping the cabinet for painting.
Begin by wiping the cabinet with a damp cloth to remove any remaining dust and debris. Then, spray the cabinets with a high-quality, low odor primer. The best one I’ve used is KILZ 3(r), which is easy to work with, adheres beautifully and blocks stains. It is also low-odor, so you can continue living in your home while working on the cabinets.
After the cabinets are primed, it is time to prepare them for staining. If you are going from a light color to a darker color, it will take much more sanding and prep than if you are going the other way around. It is also a good idea to use a stain conditioner on the wood before you start staining. This will help the stain absorb better and prevent blotching or unevenness. After the stain dries, you should apply a clear topcoat to protect your new finish.
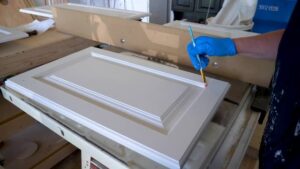
Brush Coat
Cabinets are one of the most used items in a home, and like any item they can become worn down from daily use. Many homeowners decide to refinish their cabinets to fix scratches, gouges and stains that occur over time. The best way to do this is to either stain or paint the cabinets. Staining is great for a natural wood look while painting offers a more modern and clean finish. Both options are effective but a professional should always be hired to perform the work for safety and quality reasons.
Before you can refinish your cabinets you must first remove any hardware and carefully sand the existing surface. This is a crucial step as improper prep can compromise the entire project. This could result in a less durable finish or even chipping. Once you have sanded the cabinets down to the bare wood it is a good idea to prime them, this will create a surface for the paint to adhere to. A primer is also a good way to protect the raw wood and make it easier to wipe down in the future.
Once the primer has dried it is time to apply the final coat of paint. A professional will always use a high-quality paint to ensure the final result is beautiful and long-lasting. A pro will always tape off edges and lays down plastic sheeting to prevent overspray, this is important because any overspray can damage surfaces such as countertops, wall paint or furniture. They will also paint in a consistent pattern to avoid smears or uneven coverage.
There are several types of paint that a professional can choose from; oil, latex and a few specialty paints. Latex paints are the most popular because they offer a more user-friendly clean up and are water based. However, professional painters will generally opt for an oil based paint as it provides a harder and more durable finish that will last longer.
Once the final coat of paint has dried it is a good idea to put on two coats of polyurethane. This will help keep your cabinets looking new for a much longer period of time and it will also protect the paint from water damage, which is common in kitchens.