Home » Posts tagged 'interior painting'
Tag Archives: interior painting
Why Hiring an Interior Painter is a Good Idea
Delaware County Painters are the most popular and affordable home improvement projects. In addition to enhancing your home’s appearance, it will also protect you from daily wear and tear.
Generally, professional painters will charge for labor, paint, and travel (if any are charged). Ask for an estimate with these costs broken out to give you a clear picture of what you’ll pay for.
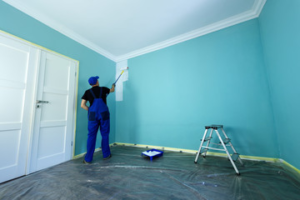
When you’re painting the interior of your house, whether it’s a room or several rooms, the preparation process is crucial. This step will determine how well the paint job looks and how long it lasts. Taking the time to prep your home’s walls, trim and wooden features will ensure that your new coat of paint adheres and covers properly.
The first step is to make a quick overview of the space. This will allow the painting contractor to address any repairs that need to be done and provide a detailed estimate of what is to be accomplished. They will look at the square footage, wall condition and any other details that need to be addressed like the type of finish or the color of paint.
Next, all large furnishings are moved away from the walls or covered with tarps to protect them from the painter’s work. This will allow the interior painter to move around and work without worrying about the risk of damaging items. This is also a good opportunity to remove any smaller objects from the workspace such as knick-knacks and decorative items that could get knocked off or damaged during the painting process.
Once everything has been cleared or covered, the surfaces that will be painted are wiped down with a low-suds detergent to clean and rough up the surface for better adhesion. This will also help to remove any mold and mildew that has accumulated. Once the area has been cleaned and is dry, any bare areas that will be painted are sanded down with a medium-grit sandpaper. If a primer is going to be used, it will be applied at this time.
It is important to note that while a primer is not required for all areas, it is recommended for porous surfaces or when changing from a dark to a light color. The primer will help the new paint cover and resist stains and is essential for a long-lasting interior painting project. It is also important to use a quality interior paint, which will be less toxic than exterior paint and have a glossier appearance. It will also have better moisture resistance than most standard paints.
Painting a room is one of the cheapest remodeling projects that adds value to your home. But if you have never painted before, hiring a professional to do the job for you is probably your best option. You may be tempted to save money by doing the work yourself, but you will likely end up spending more in the long run if you make mistakes. A painter will have the knowledge and experience to ensure that your walls are even and the color is perfect.
During the painting process, the first step is to prepare the surfaces to be painted. This includes scraping loose or flaking paint and patching holes or cracks in the drywall or plaster. It also includes sanding rough or uneven surfaces to create a smooth surface for painting and caulking around windows, trim, and doors where necessary.
After the surface is prepared, a primer is applied to provide a base for the final coats of paint. Some painters choose to use a water-based primer, while others prefer oil-based. Water-based primers are easier to clean up and are more environmentally friendly than oil-based paints.
Once the primer is dry, the painters can begin to paint. A skilled painter can apply multiple coats of paint quickly and evenly to produce a beautiful, finished look. They will use a brush to cover large areas of the wall and a roller for smaller, more detailed sections. For ceilings, the painters will usually spray the area to avoid getting paint on the floor or furniture.
The painters will also take this opportunity to address any issues that need attention. For example, if there is chipping or peeling wallpaper that needs to be replaced or if there are any loose or cracked shingles that need repair. They will also make sure that the painters are not painting over any mold or mildew.
Many homeowners choose to repaint their homes as a way of updating the style and decor. New paint colors can create a fresh and exciting feel in rooms and can complement other decorations like artwork or furniture. A fresh coat of paint is also a great way to increase the resale value of your home if you are considering selling it in the future.
When you hire a professional interior painter, they can help you choose the right colors that will bring out the beauty of your walls. They can also make repairs and touch up scuff marks on walls that have already been painted. Regardless of the condition of your walls, you can count on them to deliver quality work that will last.
When a professional painter is hired to perform touch-ups, they will first examine the wall for damage and blemishes. Once the walls are cleaned, they will then prepare them for a fresh coat of paint by applying a primer to the area being touched up. This will help the new coat blend in with the old one. After the area is prepared, the painter will apply a small amount of touch-up paint to the spot using a foam brush or a small paintbrush. A feathering technique is often used to ensure the touched-up area does not stand out.
To ensure the best results, it is a good idea to use the same type of applicator that was used when painting the original area. This will help replicate the surface texture, making it look like the blemish never existed. It is also recommended to use a thin layer of paint to avoid creating an obvious blob on the wall. The final step is to check the area and make any necessary adjustments, ensuring that the touch-up paint does not stand out.
The best way to avoid a touch-up disaster is to plan ahead. If you know that you will be doing some repainting in the future, it is a good idea to stock up on a few different shades of your chosen paint color and keep them in fully sealed containers. This will allow you to easily identify the correct color for any touch-ups that may be required in the future.
The services offered by a professional interior painter are a great way to increase the value of your home or business. They can make your walls look brand new and add a fresh appearance to any room. The professionals have the skills and experience to perform high-quality painting work that will not only look beautiful but will last for years.
The final coating is a regular paint coat that goes over the primer. This is the finish that gives your walls their color and sheen. There are a variety of different paint finishes available, and it’s important to choose the one that best suits your home. Some paints have a high gloss, while others are matte or flat.
If you’re not sure what type of paint to choose, a professional interior painter can help you decide. They’ll look at your space and determine what paint is best suited to it, and they’ll also help you select the right amount of sheen for your needs. They’ll use a damp cloth to wipe the surface of your wall before applying the final coat, and they’ll apply it in layers as needed to get the best results.
A quality interior painting job can add value to your home, and it’s an easy way to refresh a room or entire house. If you’re considering hiring an interior painter, it’s important to find out how much experience they have and to check their credentials. Having an established painting professional reduces the risk of accidents and helps ensure that the project is completed in a timely and professional manner.
The best painters have years of experience in the industry and can provide you with the highest-quality work. They’re familiar with the latest tools and techniques, and they can handle any project, no matter how big or small. A professional will also know which tools and materials are best for each project. They’ll take into account the condition of the walls and will make any repairs necessary to prepare them for painting. They’ll be able to tell you how many coats of paint are needed and will explain the benefits of each process.
The first step to understanding a price estimate is knowing the difference between direct and indirect costs. Direct costs include the cost of the paint and labor. Indirect costs include the expenses associated with running a painting business, such as insurance, equipment and overhead. It’s important to understand these costs so that you can plan accordingly for your project.
Cabinet Refinishing – Give Your Cabinets a Fresh Look
Cabinet Refinishing San Jose CA is an option that allows you to keep your existing cabinets and give them a fresh new look. It is usually cheaper than refacing and takes much less time.
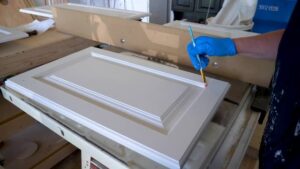
Refinishing your kitchen cabinet doors involves stripping the old paint or stain, sanding, and priming. The doors then receive two coats of color or a dye, with light sand between each.
Painting your cabinets is a cost-effective way to refresh the look of your kitchen without having to invest in expensive new hardware. It is also a good option if you want to change the color of your cabinets or simply update them to a more modern style. However, cabinet refinishing requires meticulous work and time to ensure a quality finish that stands up well to daily use and exposure to heat and moisture.
A quality paint job can make your kitchen look brand new and add significant value to your home. The key is to hire a professional who is experienced in refinishing cabinetry, has references and is properly insured and licensed. They should take the time to thoroughly clean all surfaces and carefully tape off areas where necessary, and also allow adequate drying time between coats.
You should also be aware that not all cabinet paints are created equal, and it is important to choose a product that is designed for high-traffic areas like kitchens. The natural oils in our skin break down acrylic paints over time, and when this happens, chipping and peeling occur. Paints that are formulated for cabinets are specifically made to resist this wear and tear, making them more durable and long-lasting.
Using the right tools is another crucial factor in achieving a great-looking finished result. Choosing brushes and rollers that are the proper size for the surface you are working with will save you time, as well as helping to prevent sloppy coverage. It is also important to use a degreasing cleaner before applying the first coat of paint, and to allow it to dry completely. This will help the subsequent coats of paint adhere to the surface better and will prevent the need for repeated applications.
Be sure to remove all of the doors and drawers from your cabinet boxes and label them with a permanent marker before starting the process. This will make it much easier for you to reassemble your kitchen afterward and will help you keep track of which items go where. Once you have your cabinets painted, it is wise to wait a few days before reinstalling them in order to give the paint time to fully cure to a hard enamel-like finish that is resistant to staining and scratching.
Stain
Stain offers a natural look that many homeowners enjoy. It allows the natural grain of wood to show through, providing a richer finish than paint. It’s also water-resistant, making it easy to clean spills and splashes without worrying about ruining or staining the finish. Stain also tends to match color touch-up markers better than paint, which can often have a noticeable hue difference in varying temperatures.
Before you can apply stain, though, it’s important to prepare your cabinet doors and drawer fronts for the project. Remove all hardware and set the pieces aside in a labeled container or on a dedicated work area so they won’t get lost or misplaced during the process. Vacuum and wipe down the cabinets, removing any dust that may have accumulated during sanding.
Then, clean the cabinet and door surfaces using trisodium phosphate (TSP), a heavy-duty cleaning powder that works great on wood. Mix the product according to its instructions and use a sponge to scrub each surface. Make sure to thoroughly wash the cabinet and door bevels and textured areas, as well as any other areas that might be difficult to reach with a flat brush.
After the cabinets have dried, it’s time to stain. First, make sure the surface you’re working with can accept stain by sanding again. This time, you’ll want to use a 150- to 220-grit paper and be sure to sand in the direction of the wood grain. Wipe away the excess stain within a few minutes after applying it to lighten the color or leave on for longer for a darker shade.
Be sure to test your stain on a small section of the cabinet or door. It’s also important to let the stain dry for a few hours before you begin to touch it up. Apply several coats of stain as necessary to achieve the color you’re aiming for. If you’re going from a dark to lighter shade, more coats will be required than if you were starting with a light color. If your new stain doesn’t look as good as you expected, lightly scuff the surface with steel wool after it has cured for several hours before applying a second coat.
Glaze
A glaze can transform a stained or painted cabinet door into something elegant and beautiful. It is usually a dark pigmented glaze applied with a brush or sponge to highlight the details on the cabinet door, and then wiped off. The wiped off areas leave a darker highlight that can appear antiqued or distressed, depending on the color you choose. It is also a great option for cabinets with a lot of detailing, like grooves or carved edges.
Cabinet glazes can be either warm or cool, and your kitchen design specialist can help you decide which style will best suit your home. It is always a good idea to test the glaze on a small area of the cabinet first, so you can see how it looks and feel comfortable with it before applying it to the whole kitchen.
Before attempting to apply any type of glaze, it is important that you thoroughly clean the cabinet doors. Using a degreaser spray or a rag dipped in degreaser, wipe all surfaces to remove any dirt and oils that may interfere with a clean finish. If necessary, use a wood filler to repair any dents or holes. Once everything is repaired and clean, it is time to start prepping the cabinet for painting.
Begin by wiping the cabinet with a damp cloth to remove any remaining dust and debris. Then, spray the cabinets with a high-quality, low odor primer. The best one I’ve used is KILZ 3(r), which is easy to work with, adheres beautifully and blocks stains. It is also low-odor, so you can continue living in your home while working on the cabinets.
After the cabinets are primed, it is time to prepare them for staining. If you are going from a light color to a darker color, it will take much more sanding and prep than if you are going the other way around. It is also a good idea to use a stain conditioner on the wood before you start staining. This will help the stain absorb better and prevent blotching or unevenness. After the stain dries, you should apply a clear topcoat to protect your new finish.
Brush Coat
Cabinets are one of the most used items in a home, and like any item they can become worn down from daily use. Many homeowners decide to refinish their cabinets to fix scratches, gouges and stains that occur over time. The best way to do this is to either stain or paint the cabinets. Staining is great for a natural wood look while painting offers a more modern and clean finish. Both options are effective but a professional should always be hired to perform the work for safety and quality reasons.
Before you can refinish your cabinets you must first remove any hardware and carefully sand the existing surface. This is a crucial step as improper prep can compromise the entire project. This could result in a less durable finish or even chipping. Once you have sanded the cabinets down to the bare wood it is a good idea to prime them, this will create a surface for the paint to adhere to. A primer is also a good way to protect the raw wood and make it easier to wipe down in the future.
Once the primer has dried it is time to apply the final coat of paint. A professional will always use a high-quality paint to ensure the final result is beautiful and long-lasting. A pro will always tape off edges and lays down plastic sheeting to prevent overspray, this is important because any overspray can damage surfaces such as countertops, wall paint or furniture. They will also paint in a consistent pattern to avoid smears or uneven coverage.
There are several types of paint that a professional can choose from; oil, latex and a few specialty paints. Latex paints are the most popular because they offer a more user-friendly clean up and are water based. However, professional painters will generally opt for an oil based paint as it provides a harder and more durable finish that will last longer.
Once the final coat of paint has dried it is a good idea to put on two coats of polyurethane. This will help keep your cabinets looking new for a much longer period of time and it will also protect the paint from water damage, which is common in kitchens.